
Iris Folded Cowboy Boots
Iris folding is one of my favorite techniques—it’s easy to learn but makes a big impact with its layered, dimensional look.
The spiraling pattern adds depth and texture, making these iris-folded boots a perfect design for anyone—just switch up the paper to suit him or her!
Whether you’re trying this for the first time or you’re a seasoned paper crafter, it’s a fun and eye-catching way to add serious wow to your projects.


Visit my Iris Fold Page to see more ideas, patterns, and how-to videos
Iris Folded Cowboy Boots How-to:
1. Print out 2 copies of the boot Iris Folding Pattern found HERE
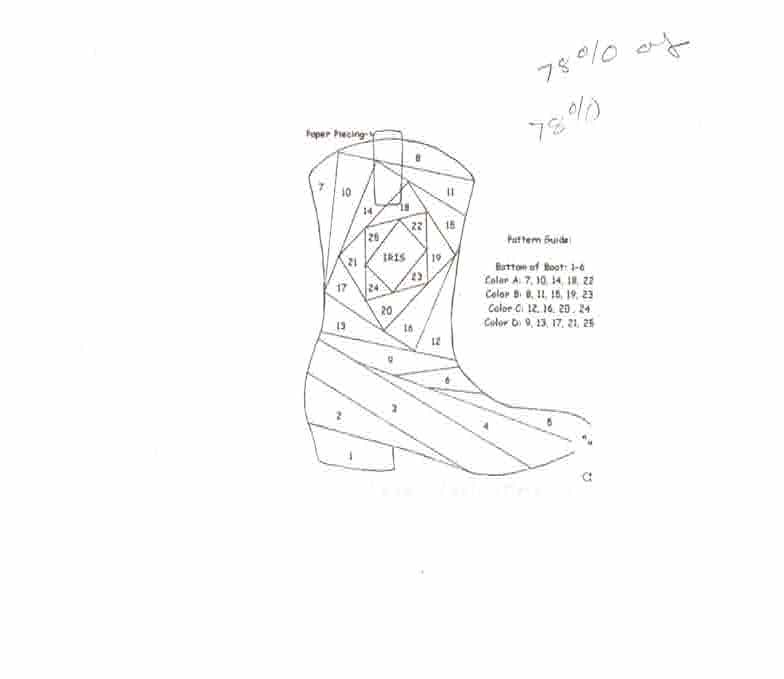

You may have to resize it before printing. I reduced the pattern 78%, then reduced again 78%.
2. Cut the boot out of the card front.
-Cut out the boot from one of the printed copies.
-Trace the boot on your card front using a pencil.
-With scissors, cut along the inside of the pencil lines, cut out the boot stencil
If you are going to stamp and/or emboss the card front, do so BEFORE you start the Iris Folding pattern.
4. Place the card front FACE DOWN on the printed pattern, lining up the opening with the pattern below. Secure the card front using a strip of washi or painter’s tape along the left edge of the card front. This creates a “hinge” which allows you to flip up the piece to check your progress from the front if desired.
You always work from the BACK of the piece when Iris Folding.
5. Cut 2-4 designs of paper in 1/2″ strips.
TIP: Place the strips FACE DOWN in the order that you’ll be using them. This will help you keep track, especially when the pattern has 4 or more sections.
Remember, you’ll be looking at the back side of the DSP as you work the pattern.
6. *Apply adhesive around the square cut-out. Place the 1st strip of DSP face down along #1 of the pattern. Continue with the 2nd strip of DSP along #2 of the pattern, the 3rd strip along #3 of the pattern, then the 4th strip along #4 of the pattern. Continue working around each section of the pattern until you have covered it, leaving an opening in the center, the Iris.
*The boot pattern consists of 4 sections, so you could have 4 different paper designs.
I chose to use only 2 paper designs. So, sections A and C use one design, and sections B and D use the second design.
7. Place a piece of glimmer paper or similar over the opening, covering the Iris. For the masculine boot, I used a small piece of laminated burlap sheet from my stash for this card. For the feminine boot, I used a piece of black glimmer paper.
Usually, the Iris piece is a special piece of paper, glimmery or textured.
Done!
Your Iris Folded piece is complete.
8. Now to finish the cards:
-Fold a strip of coordinating card stock in half and add to the top of the boot to make a boot strap
-Add a greeting and embellishments to complete